Adobe Lightroom offers multiple features and advanced editing tools. How to make a Collage in Lightroom is a common question when any editor plans to use it in photo editing. While applying Lightroom Collage, users need to know the essential tools and learn the basic skills to implement them. However, it doesn’t mean you must be an expert in photo editing.
Knowing basic understanding is effective for beginners and professional photographers before applying to achieve maximum results. Adobe Lightroom is simple, user-friendly software. However, there are a few skills you need to follow when applying this tool. This article will explain all the details about how to make a collage in Lightroom.
Follow these guidelines step-by-step to design an attractive Collage demonstrating your photographic creativity. From setting and organizing to customizing and exporting the photos, all essential features and methods are discussed here to assist you in creating Lightroom collages.
Essential Tools to Create Collage in Lightroom
- Photo resizing: Photos need resizing, dragging the ground, and arrangement adjusting tools. With the help of moving, you can move or shift photos into the Print Module.
- Cell tool: With the help of the cell tool, you can create boxes or cells. Depending on your image size requirements, you can also change the size of cells. Remember, your photos will go into these cells or boxes. It’s the perfect feature to customize images in Lightroom.
- Margin Controls: Margin control plays a main role in creating Lightroom Collage. This tool is applied to make space between the photos, which depends on interest in how much distance should be between the images. However, it is suggested that more distance is maintained in dark or colorful photos. While in light color blending, it’s better to have less distance.
- Background Color: The background color is as important as the front view in photos. Thus, this tool helps to choose colors depending on the image style. If your Collage is colorful it’s good to apply neutral, like black or white, to make it look attractive.
- Adjustment Brushes: These are also known as color adjustment brushes that can edit specific parts of images. You can change the collage image color to darker or lighter tones.
Print Module
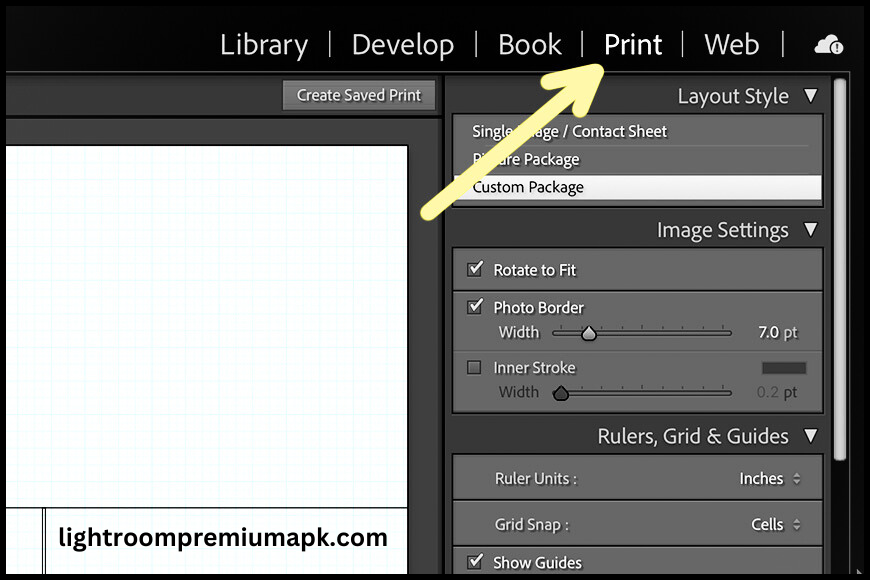
The print Module in Lightroom is not visible on the first screen. It would be helpful to find it in the drop-down menu file bar. You can also find it directly through the keyword shortcut. Press the “Cmd+P(Mac) or ctrl+P(window)” keys, and then the print module opens. Thus, you can now make a Lightroom Collage and select the print in the module section.
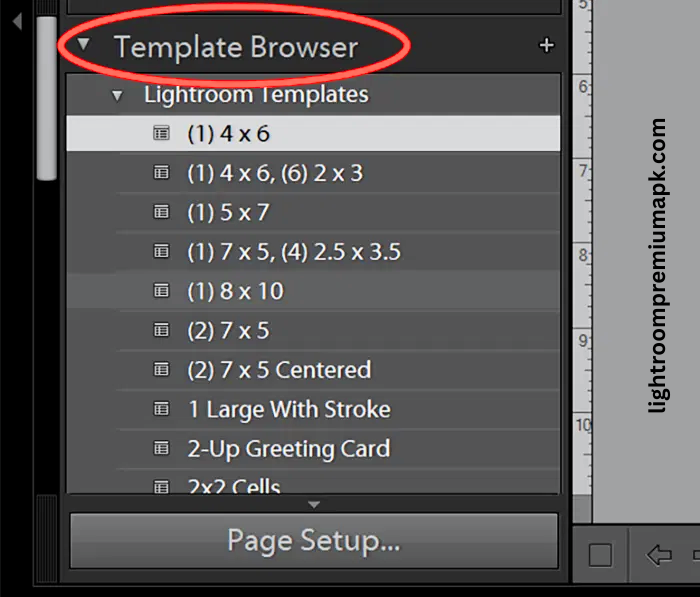
Select the template on the left side of the browser where the list of existing templates appears. However, you can also make new templates to customize Lightroom Collage. There are different sizes of templates. The regular sizes are 4×6 and 8×10. However, if this size doesn’t match the image requirement, you can select customizable Collage templates to change the size of the photos.
Steps to follow For Creating Adobe Lightroom Collage
Step-1: Lightroom Collage Settings
Users must keep in mind the sizes of each that they will use in Lightroom collage for better layout and file creation. To create a layout will require customized settings. For example, if the user wants to create a collage of four images. One landscape image on top and the remaining images below. We can assume that such a collage setting will require a 1000px width in size.
Step-2: Creating Templates for Lightroom Collage
It’s pretty tricky for you to make templates for the first time, but the whole process will be easy once you make it. You can also use your created template anytime; it is saved in your Lightroom on the left side of the column. Click on the “+” key; thus, you can easily drag the photo and add it to a specific box.

When you create a template, you can quickly put the images, whether you include 5 photos or more. The process is the same for all. Thus, it is better to have some pictures to put on as a first trial so you can better understand the template design requirements.

Step-3: Import and Edit The Photos To Lightroom
- If you haven’t already imported the photo into Adobe Lightroom, this is the pre-collage-creating step. Go to settings, select the photo or files you want to include in the collage and choose the location of imported images.
- Once you import the photos into Lightroom, the next step is to edit the images. You can also use the Lightroom batch editing option to simplify your work.
Step-4: Create The Workspace For Your Lightroom Collage
When you edit the photo in the Lightroom app, you need to create the space for a collage. Go to the “print panel” of Lightroom, select the “print job” menu, and make the space for collage. The workspace must have specific areas for every photo, space between the images, and borders or edges between the photo and the outside of it.
Step-5: Photo Layout For Lightroom Collage
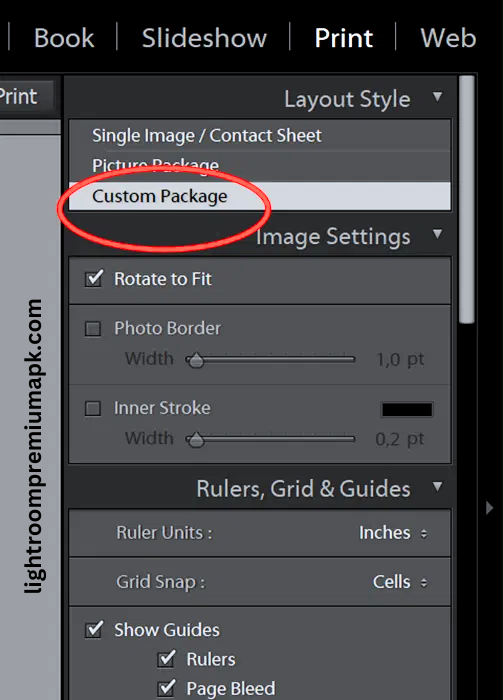
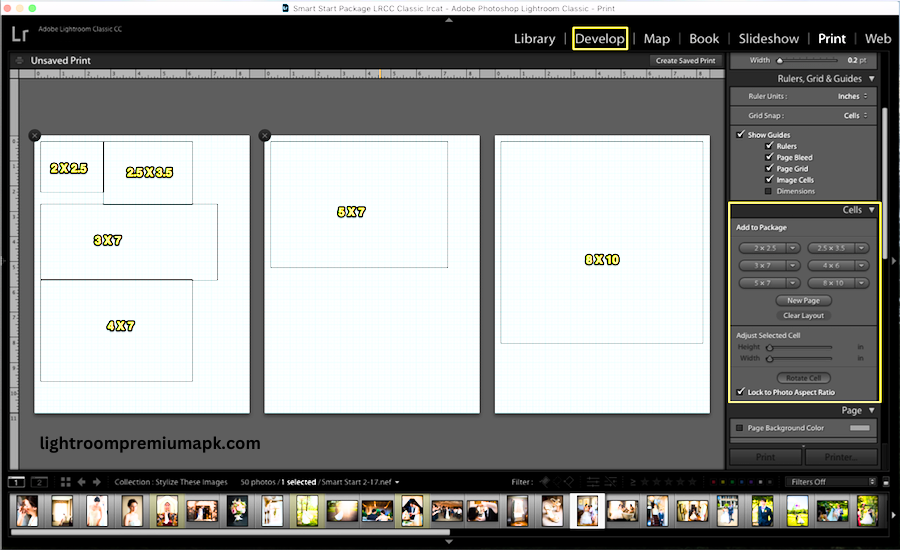
After Collage space, you can create extra cells or boxes for photo layout design. In the print menu cell section, select the add to package. You can customize your photo requirements by using the predetermined cell and use different space sizes of these cells to design a layout to get a perfect collage.
Step-6: Photo Adding in Collage Layout
After finalizing the collage layout design in the Lightroom app, the next step is to add your selected image to a specific layout cell. You are just required to click on your selected images and drag them to the desired cell of the collage layout. You can also rearrange the photo setting if you are not satisfied with the existing settings.
Important Considerations for a Lightroom Collage
How to make a collage in Lightroom requires some reflection to create a layout because it’s not only a technical process but also professionalism to look appealing. There is a need to follow core principles to create a professional design that attracts new clients. Its key considerations are maintaining balance, alignment, proximity, and theme in layout.
Balance
The Lightroom collage layout design maintains the balance in photos so that the image comes into a specific space, and the balance provides extra shine and attraction. Thus, photographers must keep a symmetrical balance where equal-sized photos are arranged on either side of the collage. In contrast, an asymmetrical balance where different-sized photos are put off the center gives a unique collage design.
Collage Alignment
Another fundamental principle to creating collage design is alignment. Here, professional photographers skillfully add the photo and design matching image. The edge alignment is where photos are arranged into the outer edge of the Collage design, and the center alignment is where photos are placed into a center horizontal or vertical line.
These alignment adjustment methods are perfect for achieving an attractive Lightroom Collage design. However, make sure to add a photo in alignment so the design can be lined up. It will demonstrate the photographer’s professional skills in the field. Thus, the chances of attracting will increase.
Collage Proximity
Proximity is also a key component for quality Lightroom collage designs as it describes the space or border between photos in a collage. For a professional outlook of a Collage, ensure that the distance among all images is the same whether there are single or ten photos. This arrangement will help to create an organized layout design that looks glam to your photos.
Theme
As the “Theme” name shows, it represents the main idea and, thus, selects the image style to look attractive. It’s the main element of your collage design because it can provide the best visual related to your collage. It creates the perfect image style and gives equal value to all photos, whether in the center or the side of the collage.
For instance, if you want to create wedding photos in a collage, ensure all the photo locations are indoor or outdoor. Because the mix of lighting and color tones makes a collage look odd. Thus, choose a similar photo to give properly themed photos; otherwise, the viewers won’t understand the theme of the images.
These are a few main design rules that expert photographers follow. You can gain professional-level proficiency by following these principles and practicing consistently. However, you can use professional designer templates, which make the theme design simpler and easier for beginners.
Using A Lightroom Collage Template
The pre-existing Lightroom collage template is easy to apply; these premade templates are less time-consuming and professional designs. You can use various collage template designs developed by expert designers, which are available for free. Such premade templates will give a perfect collage layout design and also provide professional guidelines to its users.
Step-1: Importing Photo in the Lightroom Collage
Image Importing in the Collage template is the same as you import photos into Adobe Lightroom. To make the process more convenient, users must first import the selected images into the application. Next, drag them to the collage template. You can choose a file and edit it easily afterward when needed. This will create consistency in your workflow as well as save you time.
Step-2: Downloading the Lightroom Collage Template
You can find a huge variety of pre-existing Collage template designs that are available online, including free and paid templates. However, it is recommended to choose only those templates that go well with your images. For instance, preset or Cole Classroom has maintained a library of Lightroom Collage templates. Here you can download any of them by unzipping the template file, depending on your requirements.
Step-3: Importing Template and Add the Photos in the Lightroom Collage
Once the desired template is downloaded, the next step is to import that into the Lightroom app. At this stage, for your assistance, you can also create new folders in the print module template browser menu. You can also give it a specific name to download and find it easily in future searches whenever required. Then, you can conveniently add the selected images to the imported Collage template.
Step-4: Border Selection for the Lightroom Collage
If you want to create a border, this is also an easy process. Just click on the image setting on the right side and mark the box next to the image borders. Additionally, if you feel something interrupted in Collage, you can remove it simply by turning off the image box, Dimension in the Ruler Grids and Guide panel.
Step 5: Taking Printing of the Lightroom Collage
Lightroom Collage offers to print single photos or complete albums. It’s easy for users to print the image and share it on social media platforms.
Step 6: Add a Watermark in Lightroom Collage
The watermark is located in the menu page panel of Adobe Lightroom. It allows the users to apply the Watermark tool, but it’s not mandatory, depending on the photographer’s choice to use Watermark in photos. There are two options to apply, whether you like watermarking or an identity plate. Both tools give a unique look.
You can also apply your own logo to the entire Collage or choose a specific image. Additionally, you can also change the background color in the panel by clicking on the panel to select the color and marking the checkbox.
Step 7: Exporting Collage as a JPEG File
Once you finish the editing work, You can easily export the collage image in a JPEG file format as it is a high-quality format. Next, click on “print to file”. There are various options available in Lightroom Collage as users can copy and post it on social media, or if they are interested in editing later. It’s also possible to apply “saved print” in the Lightroom application, and the photo will be saved.
Users can also name the Collage collection in Lightroom’s “dialogue box”, where you can see the collection of images in the print saved panel. The collection is visible In the print Module (printer symbol) setting panel. Thus, you can revisit and edit it anytime.
How to Make a Collage in Lightroom For Different Social Media Platforms
Collages are made to tell a story in one frame, attracting users to share it on social media platforms. Thus, how to make a Collage in Lightroom criteria and demands are different for every social media platform. It requires you to create a Collage that matches every site when you post it. The collage social media creation guidelines are essential for showing professional posts.
| Social Platform | Perfect Collage Size |
| 1200x630Pi | |
| 1080x1080Pi | |
| 1600x900Pi | |
| 1000x1500Pi | |
| 1200x627Pi |
Pro Tips For Social Media Collage Design
- For Facebook collage posts, apply landscape layout.
- For Instagram, a square layout design is the best option.
- For Twitter, a wide collage size is suitable.
- For Pinterest, a lengthy layout is attractive.
- LinkedIn uses professional layout design to get the attention of the professional community.
Additional Tips for Lightroom Collage
How to make a collage in Lightroom? It’s not as simple as you think. You need to care about balance, color size, and outlook for professional work. For this creative work, you need to apply professional techniques. Here, essential tips will help you create a professional Collage design for clients.
Negative spaces: Avoid negative or empty spaces in collages and between the images. Plan where you will put spaces in the collage.
Color Combination: Carefully select the color that matches each other; using matching colors put all your images in one frame, which seems like one image. Apply Lightroom color adjustment tools that blend all the elements equally.
Apply Effective Texture: Apply Lightroom texture like grains or fabrics that define an amazing story. It adds engagement and more dynamic influence in collage.
Collage Masking: Apply to mask to help fine-tune the visible part of the photos. This blending is perfect for showing smoothness or highlighting the prominent sections, like the area where you want to focus on a required aspect in the image.
Problems and Solutions When Making a Collage
Don’t worry about the problem, it gives you a chance to practice more and more. Although it’s easy to create a collage, there might be problems for those who never used it earlier. Therefore, to tackle these issues when making the collage in Adobe Lightroom, here are instructions provided to resolve the uncertain issue.
Tackle Overlap Photos: Sometimes, photos overlap and need to be corrected. Otherwise, it gives an odd impression to viewers. To resolve the problem, you must resize or change the dimensions of overlap photos to show all elements prominently.
Size Adjustment: Another critical issue is that sometimes enlarging the photo size causes the original quality to be lost. Thus, settling it requires high-resolution images and resizing photos with adjustment tools. Never drag any image or resize it without using a reliable tool to maintain its high quality import.
Apply coordinated Look: For the matching outlook in Lightroom Collage, users may apply the same filter and color tones. This will ensure it matches all image styles, perfect for a comprehensive and identical Collage view to give it a professional outlook.
Balance the Collage Arrangement: Balcing the outlook is pivotal for an attractive collage in the professional edition. Don’t overload one side and empty the other. Make sure to arrange the images in sequence for parallel composition and shift the image to the other if one side is overwhelmed.
Summary
Creating an Adobe Lightroom Collage is easy to apply and doesn’t require more effort, i. This article describes the comprehensive method of how to make a collage in Lightroom. From creating personal to pre-existing template designs are discussed in detail. This article will assist you in your professional journey.
Lightroom Collage describes the whole event in a single outlook. It is perfect for those photographers who like to share stories with viewers in group photos. It’s ideal if you demonstrate your portfolio Collage. Ultimately, the clients see your work experience. If you post on social media it’s another excellent idea to showcase your work and grab attention.
Frequently Asked Questions
Meta Description
Complete guidelines on how to make a collage in Lightroom, including importing, Layout design, customized template, and exporting to get a professional outlook.
Meta Title
How to Make a Collage in Lightroom: Step-by-step Tutorial to get the perfect result.